RabbitMQ安装、配置与入门
本文共 6366 字,大约阅读时间需要 21 分钟。
1、下载与安装
1.1 Erlang下载安装
由于RabbitMQ使用Erlang语言编写,所以先安装Erlang语言运行环境。
 下载后,直接单击Next下一步进行安装
 然后配置环境变量
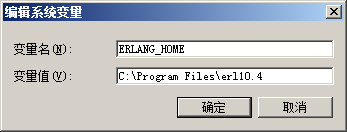
ERLANG_HOME=C:\Program Files\erl10.4
在Path中增加
%ERLANG_HOME%\bin
1.2 RabbitMQ下载安装

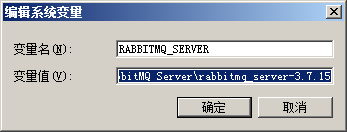
RABBITMQ_SERVER=C:\Program Files\RabbitMQ Server\rabbitmq_server-3.7.15
继续在Path中增加
%RABBITMQ_SERVER%\sbin;
2、基本配置
2.1 开机启动
Microsoft Windows [版本 6.1.7601]版权所有 (c) 2009 Microsoft Corporation。保留所有权利。D:\Users\chengyq>rabbitmq-service enableC:\Program Files\erl10.4\erts-10.4\bin\erlsrv: Service RabbitMQ enabled.
2.2 启动服务
D:\Users\chengyq>rabbitmq-service start请求的服务已经启动。请键入 NET HELPMSG 2182 以获得更多的帮助。
2.3 查询状态
D:\Users\chengyq>rabbitmqctl statusStatus of node rabbit@TPA-VDI-OA02-10 ...[{pid,9344}, {running_applications, [{rabbit,"RabbitMQ","3.7.15"}, {mnesia,"MNESIA CXC 138 12","4.16"}, {rabbit_common, "Modules shared by rabbitmq-server and rabbitmq-erlang-client", "3.7.15"}, {ranch,"Socket acceptor pool for TCP protocols.","1.7.1"}, {ssl,"Erlang/OTP SSL application","9.3"}, {public_key,"Public key infrastructure","1.6.7"}, {asn1,"The Erlang ASN1 compiler version 5.0.9","5.0.9"}, {inets,"INETS CXC 138 49","7.0.8"}, {jsx,"a streaming, evented json parsing toolkit","2.9.0"}, {crypto,"CRYPTO","4.5"}, {sysmon_handler,"Rate-limiting system_monitor event handler","1.1.0"}, {os_mon,"CPO CXC 138 46","2.5"}, {observer_cli,"Visualize Erlang Nodes On The Command Line","1.5.0"}, {xmerl,"XML parser","1.3.21"}, {recon,"Diagnostic tools for production use","2.5.0"}, {lager,"Erlang logging framework","3.6.10"}, {goldrush,"Erlang event stream processor","0.1.9"}, {compiler,"ERTS CXC 138 10","7.4"}, {syntax_tools,"Syntax tools","2.2"}, {sasl,"SASL CXC 138 11","3.4"}, {stdlib,"ERTS CXC 138 10","3.9"}, {kernel,"ERTS CXC 138 10","6.4"}]}, {os,{win32,nt}}, {erlang_version, "Erlang/OTP 22 [erts-10.4] [64-bit] [smp:4:4] [ds:4:4:10] [async-threads:64]\n"}, {memory, [{connection_readers,0}, {connection_writers,0}, {connection_channels,0}, {connection_other,0}, {queue_procs,0}, {queue_slave_procs,0}, {plugins,16740}, {other_proc,23525912}, {metrics,196492}, {mgmt_db,0}, {mnesia,77816}, {other_ets,2525544}, {binary,199520}, {msg_index,32208}, {code,24245647}, {atom,1131721}, {other_system,11012656}, {allocated_unused,11156960}, {reserved_unallocated,0}, {strategy,rss}, {total,[{erlang,62964256},{rss,74121216},{allocated,74121216}]}]}, {alarms,[]}, {listeners,[{clustering,25672,"::"},{amqp,5672,"::"},{amqp,5672,"0.0.0.0"}]}, {vm_memory_calculation_strategy,rss}, {vm_memory_high_watermark,0.4}, {vm_memory_limit,3435787059}, {disk_free_limit,50000000}, {disk_free,175843475456}, {file_descriptors, [{total_limit,8092}, {total_used,2}, {sockets_limit,7280}, {sockets_used,0}]}, {processes,[{limit,1048576},{used,243}]}, {run_queue,1}, {uptime,872}, {kernel,{net_ticktime,60}}] 2.4 查看用户
D:\Users\chengyq>rabbitmqctl list_usersListing users ...user tagsguest [administrator]
2.5 开启rabbitmq_management
开启rabbitmq_management插件,在web界面查看和管理RabbitMQ服务
D:\Users\chengyq>rabbitmq-plugins enable rabbitmq_managementEnabling plugins on node rabbit@TPA-VDI-OA02-10:rabbitmq_managementThe following plugins have been configured: rabbitmq_management rabbitmq_management_agent rabbitmq_web_dispatchApplying plugin configuration to rabbit@TPA-VDI-OA02-10...The following plugins have been enabled: rabbitmq_management rabbitmq_management_agent rabbitmq_web_dispatchstarted 3 plugins.D:\Users\chengyq>
地址
默认的用户名:guest 默认的密码为:guest
3、简单样例程序
3.1 依赖
com.rabbitmq amqp-client 5.7.1
3.2 公共类
import com.rabbitmq.client.AMQP;import com.rabbitmq.client.Connection;import com.rabbitmq.client.ConnectionFactory;import java.io.IOException;import java.util.concurrent.TimeoutException;public class Util { public static Connection getConnection() { // connection是socket连接的抽象,并且为我们管理协议版本协商(protocol version negotiation), // 认证(authentication )等等事情。这里我们要连接的消息代理在本地,因此我们将host设为“localhost”。 // 如果我们想连接其他机器上的代理,只需要将这里改为特定的主机名或IP地址。 ConnectionFactory factory = new ConnectionFactory(); factory.setHost("localhost"); factory.setPort(5672); //默认端口号 factory.setUsername("guest");//默认用户名 factory.setPassword("guest");//默认密码 try { return factory.newConnection(); } catch (IOException e) { e.printStackTrace(); } catch (TimeoutException e) { e.printStackTrace(); } return null; }} 3.3 消息发送者
import com.rabbitmq.client.Channel;import com.rabbitmq.client.Connection;public class Send { private final static String QUEUE_NAME = "Hello"; public static void main(String[] args) throws Exception { Connection connection = Util.getConnection(); Channel channel = connection.createChannel(); // 接下来,我们创建一个channel,绝大部分API方法需要通过调用它来完成。 // 发送之前,我们必须声明消息要发往哪个队列,然后我们可以向队列发一条消息: channel.queueDeclare(QUEUE_NAME, false, false, false, null); String message = "[x] Hello world"; channel.basicPublish("", QUEUE_NAME, null, message.getBytes()); System.out.println("Sent '" + message + "'"); channel.close(); connection.close(); }} 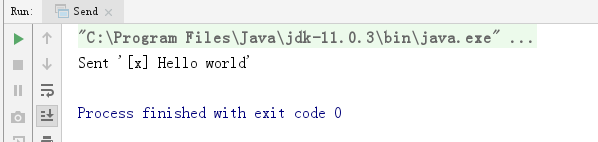
3.3 消息接受者
import com.rabbitmq.client.*;import java.io.IOException;public class Receiver { private final static String QUEUE_NAME = "Hello"; public static void main(String[] args) throws Exception { Connection connection = Util.getConnection(); Channel channel = connection.createChannel(); channel.queueDeclare(QUEUE_NAME, false, false, false, null); System.out.println(" [*] Waiting for messages. To exit press CTRL+C"); Consumer consumer = new DefaultConsumer(channel) { @Override public void handleDelivery(String consumerTag, Envelope envelope, AMQP.BasicProperties properties, byte[] body) throws IOException { String message = new String(body, "UTF-8"); System.out.println(" [x] Received '" + message + "'"); } }; channel.basicConsume(QUEUE_NAME, true, consumer); }} 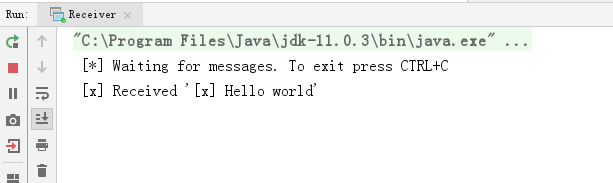
转载地址:http://ywtab.baihongyu.com/
你可能感兴趣的文章
再探偏移注射
查看>>
DNS Security Tips
查看>>
符号执行
查看>>
Remote Installation Service (RIS) in Windows Server 2003
查看>>
Layer Four Traceroute
查看>>
Hardening guide for Apache 2.2.15 on RedHat 5.4 (64bit edition)
查看>>
Microsoft Outlook Web Access (OWA) version 8.2.254.0 information disclosure vulnerability
查看>>
STP mitm attack idea
查看>>
Month of PHP Security - Summary
查看>>
近期将要购买的图书
查看>>
nginx Directory Traversal Vulnerability
查看>>
Linux下apache+svn+ssl完美结合搭建安全版本控制平台
查看>>
Nginx 0.8.35 Space Character Remote Source Disclosure
查看>>
showrun的cissp经验谈
查看>>
6月4日要买的书
查看>>
nginx Remote Source Code Disclosure and Denial of Service Vulnerabilities
查看>>
Anti-sec安全培训 部分试看视频
查看>>
FreeBSD kernel NFS client local vulnerabilities
查看>>
JXplorer 的简单使用
查看>>
如何启用 LDAP 签名 Windows Server 2008 中
查看>>